DotNetNuke,NUnit – Open Source Framework

DotNetNuke is a free, Open Source Framework ideal for creating Enterprise Web Applications.

DotNetNuke is an open source web application framework ideal for creating, deploying and managing interactive web, intranet and extranet sites.

DotNetNuke is designed to make it easy for users to manage all aspects of their projects.  Site wizards, help icons, and a well-researched user interface allow universal ease-of-operation.

DotNetNuke can support multiple portals or sites off of one install.  In dividing administrative options between host level and individual portal level, DotNetNuke allows administrators to manage any number of sites – each with their own look and identity – all off one hosting account.

DotNetNuke comes loaded with a set of built-in tools that provide powerful pieces of functionality.  Site hosting, design, content, security, and membership options are easily managed and customized through these tools.

DotNetNuke is supported by its Core Team of developers and a dedicated  international community.  Through user groups, online forums, resource portals and a network of companies who specialize in DNN®, support is always close at hand.

DotNetNuke can be up-and-running within minutes.  One must simply download the software from DotNetNuke.com, and follow the installation instructions.  In addition, many hosting companies offer free installation of the DotNetNuke application with their plans.

DotNetNuke includes a multi-language localization feature which allows administrators to easily translate their projects and portals into any language.  And with an international group of hosts and developers working with DotNetNuke, familiar support is always close at hand.

DotNetNuke is provided free, as open-source software, and licensed under a standard BSD agreement. It allows individuals to do whatever they wish with the application framework, both commercially and non-commercially, with the simple requirement of giving credit back to the DotNetNuke project community.

DotNetNuke provides users with an opportunity to learn best-practice development skills — module creation, module packaging, debugging methods, etc — all while utilizing cutting-edge technologies like ASP.NET 2.0, Visual Web Developer (VWD), Visual Studio 2005 and SQL Server 2005 Express.

DotNetNuke is able to create the most complex content management systems entirely with its built-in features, yet also allows administrators to work effectively with add-ons, third party assemblies, and custom tools.   DNN modules and skins are easy to find, purchase, or build.  Site customization and functionality are limitless.

 NUnit

NUnit framework is port of JUnit framework from java and Extreme Programming (XP). This is an open source product. You can download it from http://www.nunit.org.  The NUnit framework is developed from ground up to make use of .NET framework functionalities. It loads test assemblies in separate application domain hence we can test an application without restarting the NUnit test tools.  The NUnit further watches a file/assembly change events and reload it as soon as they are changed. With these features in hand a developer can perform develop and test cycles sides by side.  Before we dig deeper, we should understand what NUnit Framework is not:  

  • It is not Automated GUI tester.

  • It is not a scripting language, all test are written in .NET supported language e.g. C#, VC, VB.NET, J# etc.

  • It is not a benchmark tool.

  • Passing the entire unit test suite does not mean software is production ready.

  • Implementing the Test

You can write the test anywhere you like, for example:  

  • A test method in application code class, you can use #if-#endif directives to include/exclude the code.

  • A test class in application assembly, or

  • A separate test assembly.

 I recommend implementing all the tests in the separate assembly because a unit test is related to quality assurance of the product, a separate aspect.  Implementing unit test within the main assembly not only bloats the actual code, it will also create additional dependencies to NUnit.Framework. Secondly, in a multi-team environment, a separate unit test assembly provides the ease of addition and management. Consider we want to write a simple Calculator class with four methods, which take two operands and perform basic arithmetic operations like addition, subtraction, multiplication and division. The code below defines the skeleton of a typical test class.
using System;

using NUnit.Framework;

namespace UnitTestApplication.UnitTests

{

       [TestFixture()]

       publicclass Calculator_UnitTest

       {

              private UnitTestApplication.Calculator calculator = new Calculator();

              [SetUp()]

              publicvoid Init()

              {

                     // some code here, that need to be run

                     // at the start of every test case.

              }

              [TearDown()]

              publicvoid Clean()

              {

                     // code that will be called after each Test case

              }

              [Test]

              publicvoid Test()

{

}

       }

}

Things to note are:
Import NUnit.Framework namespace.

The Test class should be decorated with TestFixture attribute.
The class should have standard constructor.
The class can have optional functions decorated with SetUpAttribute and TearDownAttribute. The method, decorated with SetUpAttribute is called before any test case method is called, whereas method decorated with TearDownAttribute is called after the execution of a test case method.
All the test method should have standard method signature as

public void [MethodName](){}

or

Public Sub [MethodName]

End Sub

Now that we know the skeleton of a test class, lets look at a typical test method:
[Test]

publicvoid Test_Add()

{

      int result = calculator.Add(2, 2);

      Assertion.AssertEquals(4, result);

}

The key line to note is Assertion.AssertEquals(4, result); Assertions are the way to test for fail-pass test. NUnit framework support following assertions:
Assert()

AssertEquals()

AssertNotNull()

AssertNotNull()

AssertNull()

AssertSame()

Fail()

You can use as many Assert statements in a method as you like. However, NUnit framework, will show a method as failed if even a single assertion fails, as expected. But what is important to remember is that if first assertion fails, next assertion will not be evaluated, hence you will have no knowledge about next assertion. Therefore it is recommended that there should only be one Assertion statement per test method. If you believe there should be more than one statement, create a separate test case method.

What Should Be Tested?

This is a common and valid question. Typical test cases are:
Test for boundary conditions, e.g. our Calculator class only multiply signed integers, we can write a test for multiplying two big numbers and make sure our application code handles it.
Test for both success and failure.
Test for general functionality.

Introduction
 Whitepaper: Integrating Telephony Services into .NET Applications
Sponsored by Avaya
Learn how developers using Microsoft’s .NET framework can use SIP Objects.NET to gain simple and flexible access to telephony networks. SIP Objects.NET enables developers to access a wide variety of enterprise or traditional carrier networks by leveraging technologies such as Avaya’s SIP Application Server. »
 
 
 Download: Iron Speed Designer .NET Application Generator
Sponsored by Iron Speed
Iron Speed Designer is an application generator that builds database, reporting, and forms applications for .NET. Quickly create visually stunning, feature-complete Web applications with database access and security. Iron Speed Designer accelerates development by eliminating routine infrastructure programming, giving you ready-to-deploy N- tier Web applications in minutes. »
 
 
 Download: SQL Anywhere Developer Edition
Sponsored by Sybase
SQL Anywhere provides data management and exchange technologies designed for database-powered applications that operate in frontline environments without onsite IT support. SQL Anywhere is offered at no cost for development and testing. Register before the 60 day evaluation expires to continue using the product free of charge for development and testing, without a time limit.»
 
 
 Whitepaper: Building a Foundation for SIP
Sponsored by Avaya
This whitepaper describes SIP from both business and technical perspectives. Read about how SIP can improve internal and external communications, as well as the basics of how SIP technology works, and how to build a SIP environment. »


Usually, software testing is done at the end of the software development cycle and is relegated to a less creative testing department, hence making software testing a low priority in the development process. This approach results in error detection at the very end and sometimes even by the customer.

In reality testing is much easier than its reputation. As a matter of fact, testing is much fun because it results in better design and cleaner code. The time spent specifying test cases quickly pay off, you can define a series of test cases once and you can use them again and again. This means that regardless of looming deadlines, the developer always has a complete test suite at hand. This saves invaluable time when integrating new functions and brings a significant competitive advantage for both new and further development.

What Are Unit Tests?

A unit test is nothing more than the code wrapper around the application code that permits test tools to execute them for fail-pass conditions.

Why Should You Use Unit Tests?

Forget for a moment that there is something called XP (Extreme Programming) that coined the Unit Test term. The most of the projects developed today are always under tight development schedules and usually have only its developers as the tester of their code. By writing the unit tests themselves they can have a head start towards bug-free and quality code.

One will argue that if the developer is writing all the unit tests, it is quite possible to get the set of unit tests that are passable, because these unit tests are developed based either on the foreknowledge of application code or the assumptions made in the application code. However, do not be fooled with this, imagine what will happen if developer decides to change the application, her old test cases will break. That will force her to either re-think her changes or re-write the unit tests.

The application architect or analyst can write all the unit test cases upfront (Not what XP recommend, but we are not worried about it) and test the developed code against these cases and functionalities. The advantage is well defined deliverable for the developer and more quantifiable progress. A developer can also use this to disciple their work habits e.g. she can write a set of unit test that she wants to accomplish in a days work. Once tests ready, she can start developing the application and check her progress against the unit test. Now she has a meter to check her progress.

What is the NUnit Framework?

NUnit framework is port of JUnit framework from java and Extreme Programming (XP). This is an open source product. You can download it from http://www.nunit.org. The NUnit framework is developed from ground up to make use of .NET framework functionalities. It uses an Attribute based programming model. It loads test assemblies in separate application domain hence we can test an application without restarting the NUnit test tools. The NUnit further watches a file/assembly change events and reload it as soon as they are changed. With these features in hand a developer can perform develop and test cycles sides by side.

Before we dig deeper, we should understand what NUnit Framework is not:
It is not Automated GUI tester.
It is not a scripting language, all test are written in .NET supported language e.g. C#, VC, VB.NET, J# etc.
It is not a benchmark tool.
Passing the entire unit test suite does not mean software is production ready.
Implementing the Test

You can write the test anywhere you like, for example:
A test method in application code class, you can use #if-#endif directives to include/exclude the code.
A test class in application assembly, or
A separate test assembly.
I recommend implementing all the tests in the separate assembly because a unit test is related to quality assurance of the product, a separate aspect.
Implementing unit test within the main assembly not only bloats the actual code, it will also create additional dependencies to NUnit.Framework. Secondly, in a multi-team environment, a separate unit test assembly provides the ease of addition and management.

A standard naming convention will also help in further developing the test suite library for your application. We will discuss this in detail in coming section. For now, let create our first test assembly.

Consider we want to write a simple Calculator class with four methods, which take two operands and perform basic arithmetic operations like addition, subtraction, multiplication and division. The code below defines the skeleton of a typical test class.
using System;

using NUnit.Framework;

namespace UnitTestApplication.UnitTests

{

       [TestFixture()]

       publicclass Calculator_UnitTest

       {

              private UnitTestApplication.Calculator calculator = new Calculator();

              [SetUp()]

              publicvoid Init()

              {

                     // some code here, that need to be run

                     // at the start of every test case.

              }

              [TearDown()]

              publicvoid Clean()

              {

                     // code that will be called after each Test case

              }

              [Test]

              publicvoid Test()

{

}

       }

}

Things to note are:
Import NUnit.Framework namespace.
The Test class should be decorated with TestFixture attribute.
The class should have standard constructor.
The class can have optional functions decorated with SetUpAttribute and TearDownAttribute. The method, decorated with SetUpAttribute is called before any test case method is called, whereas method decorated with TearDownAttribute is called after the execution of a test case method.
All the test method should have standard method signature as

public void [MethodName](){}

or

Public Sub [MethodName]

End Sub

Now that we know the skeleton of a test class, lets look at a typical test method:
[Test]

publicvoid Test_Add()

{

      int result = calculator.Add(2, 2);

      Assertion.AssertEquals(4, result);

}

The key line to note is Assertion.AssertEquals(4, result); Assertions are the way to test for fail-pass test. NUnit framework support following assertions:
Assert()

AssertEquals()

AssertNotNull()

AssertNotNull()

AssertNull()

AssertSame()

Fail()

You can use as many Assert statements in a method as you like. However, NUnit framework, will show a method as failed if even a single assertion fails, as expected. But what is important to remember is that if first assertion fails, next assertion will not be evaluated, hence you will have no knowledge about next assertion. Therefore it is recommended that there should only be one Assertion statement per test method. If you believe there should be more than one statement, create a separate test case method.

What Should Be Tested?

This is a common and valid question. Typical test cases are:
Test for boundary conditions, e.g. our Calculator class only multiply signed integers, we can write a test for multiplying two big numbers and make sure our application code handles it.
Test for both success and failure.
Test for general functionality.
The code below shows a typical boundary condition test for our Calculator case:
[Test]

[ExpectedException(typeof(DivideByZeroException))]

publicvoid Test_DivideByZero()

{

      int result = calculator.Divide(1, 0);


}

The key line of code to note here is; ExpectedExceptionAttribute and the way boundary conditions are checked. Well this seems quite obvious because .NET Framework takes care of it for us, but point here is to see how to implement. We can use the same technique to test boundary conditions for our methods.

We should always write a failure test case e.g. Consider the following test case:
[Test]

publicvoid Test_AddFailure()

{

      int result = calculator.Add(2, 2);

      Assertion.Assert(result != 1);

}

It seems like a stupid case, but look at the following implementation of Add method:
publicint Add(int a, int b)

{

      return a/b;

}

Quite an obvious error, possibly a TYPO, but remember, there is no room for typos in coding.

Some Tips and Tricks

Using VS Debugger with NUnit Framework

NUnit Framework, load and run the assemblies in separate AppDomain therefore you cannot use the debugging features of Visual Studio.

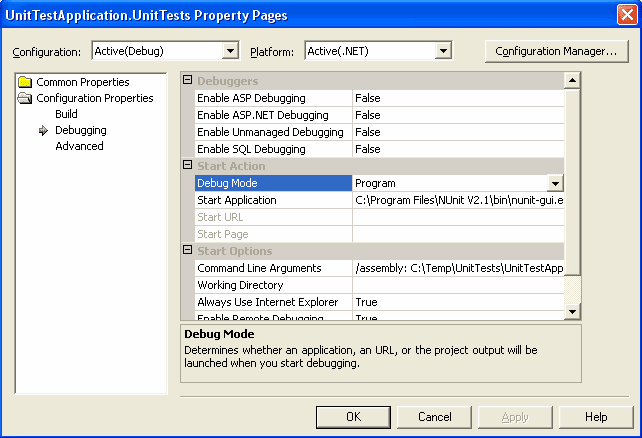
However, you can attach any external program to VS to consume an assembly. Follow these steps:
Set your test case assembly as Startup project.
Get to the property sheet for your test case assembly and set the Debug mode property to “Program”.
This property is set per project and persisted in project file. You will not get Star Application property as writeable. You need to press “Apply” button after setting Debug Mode property.
Set Start application to nunit-gui.exe that will be in bin folder of NUnit Framework folder.

You can define the command line argument for nunit-gui.exe. Alternatively, you can first start nunit-gui.exe externally and open your test case assembly, run it once and save it. Nunit-gui.exe will persist the last open file and will open it when run from visual studio.

 040922_01.gif

With this you can run and debug your application code with great features provided by the Visual Studio.

Using Configuration Files:

Using Configuration files with NUnit is a tricky business. However, once you know where to put the configuration file, it is a piece of cake. Remember, NUnit creates a separate AppDomain to load the test case assembly i.e. our configuration file should be in the working folder of this AppDomain and its name should be [TestCaseAssemblyName].dll.config. For a typical scenario, this folder will be Test case assembly project’s subfolder named “bin”. Once this knowledge in hand, you can pass al your configuration settings in this configuration file and every thing will work like magic.

Here is my demo configuration file and associated test case:
<?xmlversion=”1.0″encoding=”utf-8″?>

<configuration>

      <appSettings>

            <addkey=”test”value=”FirstTest”/>

      </appSettings>

</configuration>

and Test Case:
[Test]

publicvoid Test_Configuration()

{

string test = System.Configuration.ConfigurationSettings.AppSettings[“test”];

      Console.WriteLine(test);

      Assertion.AssertEquals(test, “MyTest”);

}

On a side note, look at this line of code Console.WriteLine(test); The nunit-gui.exe is a smart GUI that capture all the console output and present them in its “on tab frame”. You can use this simple trick for quick debugging. Use Factory Pattern Use factory pattern to define tests that uses different input values for same functionalities.

Clean Cache

The NUnit Framework caches the test case assembly information at “C:\Documents and Settings\\Local Settings\Temp\nunit20\” It is a good idea to clean this cache periodically, especially if you are running huge base of test cases.

The Naming Convention and Standards
As discussed above all test cases should go in a separate assembly. A suggested name for such assembly is [CodeAssembly].UnitTests.dll e.g.
UnitTestApplication.UnitTests.dll
You should follow the naming rule defined in .NET Framework SDK. A good tool to use is FxCop to force the naming convention.
This assembly should have at minimum one-to-one relation between methods and test methods.
Test case name should be Test_[MethodToBeTested][SomeAttribute]

e.g.
Test_Add,
Test_AddFailure.

I hope that with this information in hand you will be able to write better test cases, test fixtures and test suites that will result in not only your productivity increase, but will also create a discipline to produce bug less and efficient code.

Happy Programming!
AMDD – Agile Model Driven Development

A lot of people have been asking the question “What is Agile Software Development?” and invariably they get a different definition depending on who they ask.

Don’t panic about the different views,take your time and read it for sure it would make your life simple.

Many people will correctly say that agile software development conforms to the values and principles of the Agile Alliance (AA).

Figure 1. The Agile SDLC.

Agile

1. Iteration 0: Project Initiation
The first week or so of an agile project is often referred to as “Iteration 0” (or “Cycle 0”).  Your goal during this period is to initiate the project by:

Garnering initial support and funding for the project.  This may have been already achieved via your portfolio management efforts, but realistically at some point somebody is going to ask what are we going to get, how much is it going to cost, and how long is it going to take. You need to be able to provide reasonable, although potentially evolving, answers to these questions if you’re going to get permission to work on the project.  You may need to justify your project via a feasibility study.
Actively working with stakeholders to initially model the scope of the system.  As you see in Figure 2, during Iteration 0 agilists will do some initial requirements modeling with their stakeholders to identify the initial, albeit high-level, requirements for the system.  To promote active stakeholder participation you should use inclusive tools, such as index cards and white boards to do this modeling – our goal is to understand the problem and solution domain, not to create mounds of documentation.  The details of these requirements are modeled on a just in time (JIT) basis in model storming sessions during the development cycles.
Starting to build the team.  Although your team will evolve over time, at the beginning of a development project you will need to start identifying key team members and start bringing them onto the team.  At this point you will want to have at least one or two senior developers, the project coach/manager, and one or more stakeholder representatives.
Modeling an initial architecture for the system.  Early in the project you need to have at least a general idea of how you’re going to build the system.  Is it a mainframe COBOL application?  A .Net application?  J2EE?  Something else?  As you see in Figure 2, the developers on the project will get together in a room, often around a whiteboard, discuss and then sketch out a potential architecture for the system.  This architecture will likely evolve over time, it will not be very detailed yet (it just needs to be good enough for now), and very little documentation (if any) needs to be written.  The goal is to identify an architectural strategy, not write mounds of documentation.  You will work through the design details later during development cycles in model storming sessions and via TDD.
Setting up the environment.  You need workstations, development tools, a work area, … for the team.  You don’t need access to all of these resources right away, although at the start of the project you will need most of them.

Even today morning I had a talk from one of my collegaue in regards to the AMDD ,but it wasn’t much about what real AMDD was about. Basically I am often asked by my group members to facilitate workshops overviewing the ideas presented in the Agile Manifesto and agile techniques such as Test-Driven Design (TDD), database refactoring, and agile change management. 

One issue that many people seem to struggle with is how all of these ideas fit together, and invariably I found myself sketching a picture which overviews a generic lifecycle for agile software development projects.  This lifecycle is captured in Figure 1, which is comprised of four phases: Iteration 0, Development, Release/End Game, and Production.  Although many agile developers may balk at the idea of phases, perhaps Gary Evan’s analogy of development seasons may be a bit more palatable, the fact is that it’s been recognized that processes such as Extreme Programming (XP) and Agile Unified Process (AUP) do in fact have phases (for diagrams, see XP lifecycle and AUP lifecycle respectively).  Furthermore, the Agile MSF calls its phases/seasons “tracks”.

Figure 2: The Agile Model Driven Development (AMDD) Lifecycle.

AMDD

2. Development Iterations
During development iterations agilists incrementally deliver high-quality working software which meets the changing needs of our stakeholders, as overviewed in Figure 3

Figure 3. Agile software development process during a development iteration.

ADMC

We achieve this by:

Collaborating closely with both our stakeholders and with other developers.  We do this to reduce risk through tightening the feedback cycle and by improving communication via closer collaboration. 

Implementing functionality in priority order.  We allow our stakeholders to change the requirements to meet their exact needs as they see fit.  The stakeholders are given complete control over the scope, budget, and schedule – they get what they want and spend as much as they want for as long as they’re willing to do so.

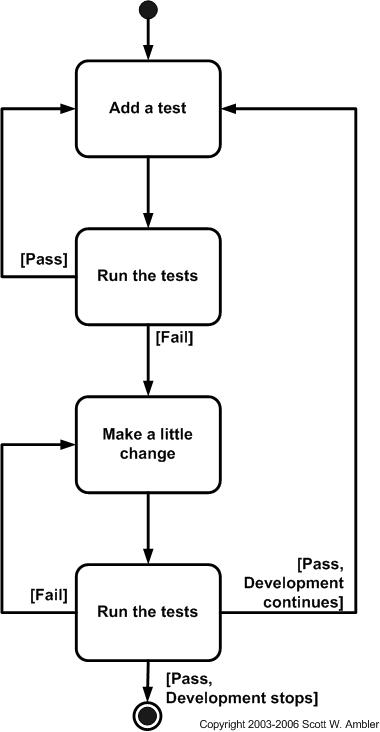
Analyzing and designing. We analyze individual requirements by model storming on a just-in-time (JIT) basis for a few minutes before spending several hours or days implementing the requirement.  Guided by our architecture models, often hand-sketched diagrams, we take a highly-collaborative, test-driven design (TDD) approach to development (see Figure 4) where we iteratively write a test and then write just enough production code to fulfill that test.  Sometimes, particularly for complex requirements or for design issues requiring significant forethought, we will model just a bit ahead to ensure that the developers don’t need to wait for information.

Ensuring quality.  Agilists are firm believers in following guidance such as coding conventions and modeling style guidelines.  Furthermore, we refactor our application code and/or our database schema as required to ensure that we have the best design possible. 

Regularly delivering working software.  At the end of each development cycle/iteration you should have a partial, working system to show people.  Better yet, you should be able to deploy this software into a pre-production testing/QA sandbox for system integration testing.  The sooner, and more often, you can do such testing the better.

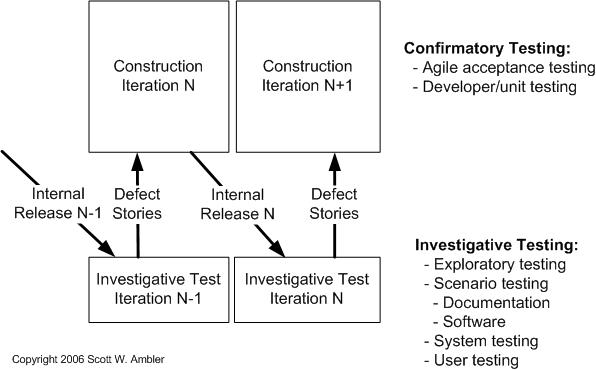
Testing, testing, and yes, testing.  As you can see in Figure 5 agilists do a significant amount of testing throughout development.  As part of development we do confirmatory testing, a combination of developer testing and agile acceptance testing.  In many ways confirmatory testing is the agile equivalent of “testing against the specification” because it confirms that the software which we’ve built to date works according to the intent of our stakeholders as we understand it today. This isn’t the complete testing picture: Because we are producing working software on a regular basis, at least at the end of each iteration, we’re in a position to deliver that working software to an independent test team for investigative testing.  Investigative testing is done by test professionals who are good at finding defects which the developers have missed.  These defects might pertain to usability or integration problems, sometimes they pertain to requirements which we missed or simply haven’t implemented yet, and sometimes they pertain to things we simply didn’t think to test for.

Figure 4. Taking a “test first” approach to development.

tddsteps.jpg
Figure 5. Testing during development iterations.

agilelifecycletesting.jpg

3. Release Iterations(s): The “End Game”

During the release iteration(s), also known as the “end game”, we transition the system into production.  Not that for complex systems the end game may prove to be several iterations, although if you’ve done system and user testing during development (as indicated by Figure 3) this likely won’t be the case.  As you can see in Figure 6, there are several important aspects to this effort:

Final testing of the system.  Final system and acceptance testing should be performed at this point, although as I pointed out earlier the majority of testing should be done during development iterations.  You may choose to pilot/beta test your system with a subset of the eventual end users.  See the Full Lifecycle Object-Oriented Testing (FLOOT) method for more thoughts on testing.

Rework.  There is no value testing the system if you don’t plan to act on the defects that you find.  You may not address all defects, but you should expect to fix some of them.

Finalization of any system and user documentation.  Some documentation may have been written during development cycles, but it typically isn’t finalized until the system release itself has been finalized to avoid unnecessary rework  Note that documentation is treated like any other requirement: it should be costed, prioritized, and created only if stakeholders are willing to invest in it.  Agilists believe that if stakeholders are smart enough to earn the money then they must also be smart enough to spend it appropriately. 

Training.  We train end users, operations staff, and support staff to work effectively with our system.

Deploy the system.  See my article entitled System Deployment Tips and Techniques.

Figure 6. The AUP Deployment discipline workflow.

aupdeploymentworkflow.jpg

4. Production
The goal of the Production Phase is to keep systems useful and productive after they have been deployed to the user community. This process will differ from organization to organization and perhaps even from system to system, but the fundamental goal remains the same: keep the system running and help users to use it. Shrink-wrapped software, for example, will not require operational support but will typically require a help desk to assist users. Organizations that implement systems for internal use will usually require an operational staff to run and monitor systems.

This phase ends when the release of a system has been slated for retirement or when support for that release has ended. The latter may occur immediately upon the release of a newer version, some time after the release of a newer version, or simply on a date that the business has decided to end support.  This phase typically has one iteration because it applies to the operational lifetime of a single release of your software. There may be multiple iterations, however, if you defined multiple levels of support that your software will have over time
 

Data Access using DLinq Quite Unbelievable? Believe it.

I have used couple of times during my application development,and its really fantastic.DLinq is so much fun. It’s so amazingly simple to write data access layer that generates really optimized SQL. If you have not used DLinq before, brace for impact!

DLinq, a component of the LINQ Project, provides a run-time infrastructure for managing relational data as objects without giving up the ability to query. It does this by translating language integrated queries into SQL for execution by the database and then translating the tabular results back into objects you define. Your application is then free to manipulate the objects while DLinq stays in the background tracking your changes automatically.
DLinq is designed to be non intrusive to your application. It is possible to migrate current ADO.Net solutions to DLinq in a piecemeal fashion, sharing the same connections and transactions, since DLinq is simply another component in the ADO.Net family.
DLinq applications are easy to get started. Objects linked to relational data can be defined just like normal objects, only decorated with attributes to identify how properties correspond to columns. Of course, its not even necessary to do this by hand. A design-time tool is provided to automate translating pre-existing relational database schemas into object definitions for you.
Together, the DLinq run-time infrastructure and design-time tools significantly reduce the work load for the database application developer. The following chapters provide an overview of how DLinq can be used to perform common database related tasks. It is assumed that the reader is familiar with Language Integrated Query and the Standard Query Operators.

The best thing about DLinq is it can generate something called Projection which contains only the necessary fields and not the whole object. There’s no ORM tool or Object Oriented Database library which can do this now because it really needs a custom compiler in order to support this. The benefit of projection is pure performance. You do not SELECT fields which you don’t need, nor do you contruct a jumbo object which has all the fields. DLinq only selects the required fields and creates objects which contains only the selected fields.

Let’s see how easy it is to create a new object in database called “Page”:

var db = new DashboardData(ConnectionString);  var newPage = new Page(); newPage.UserId = UserId; newPage.Title = Title; newPage.CreatedDate = DateTime.Now; newPage.LastUpdate = DateTime.Now;  db.Pages.Add(newPage); db.SubmitChanges(); NewPageId = newPage.ID;

Here, DashboardData is the class which SqlMetal.exe generated.

Say, you want to change a Page’s name:

var page = db.Pages.Single( p => p.ID == PageId ); page.Title = PageName; db.SubmitChanges();

Here only one row is selected.

You can also select a single value:

var UserGuid = (from u in db.AspnetUsers where u.LoweredUserName == UserName && u.ApplicationId == DatabaseHelper.ApplicationGuid select u.UserId).Single();

And here’s the Projection I was talking about:

var users = from u in db.AspnetUsers select { UserId = u.UserId, UserName = u.LoweredUserName };  foreach( var user in users ) {     Debug.WriteLine( user.UserName ); }   

If you want to do some paging like select 20 rows from 100th rows:

var users = (from u in db.AspnetUsers select { UserId = u.UserId, UserName = u.LoweredUserName }).Skip(100).Take(20);  foreach( var user in users ) {     Debug.WriteLine( user.UserName ); }   

If you are looking for transaction, see how simple it is:

using( TransactionScope ts = new TransactionScope() ) {     List<Page> pages = db.Pages.Where( p => p.UserId == oldGuid ).ToList();     foreach( Page page in pages )         page.UserId = newGuid;          // Change setting ownership     UserSetting setting = db.UserSettings.Single( u => u.UserId == oldGuid );     db.UserSettings.Remove(setting);          setting.UserId = newGuid;     db.UserSettings.Add(setting);     db.SubmitChanges();      ts.Complete(); } 

Unbelievable? Believe it.

Microsoft Patterns & Practices -Web Client Software Factory

Last week while I was preparing for my  Technology Specialist certification for NET Framework 2.0 Web Applications,I just came thru a part of understanding about the design patterns and practices.I studied a lot about the below one software factory which is going to be one of  the best & important for current trend in development.

Overview

This software factory provides proven solutions to common challenges found while building and operating large transaction processing enterprise Web sites. It helps architects and developers build modular systems that can be built by independent teams, design complex screen workflows, improved security and testability. Applications built with the software factory use proven practices for operations like centralized exception logging and can be XCopy deployed.

The software factory contains a collection of reusable components and libraries, Visual Studio 2005 solution templates, wizards and extensions, How-to topics, automated tests, extensive architecture documentation, patterns, and a reference implementation. The software factory uses ASP.NET, Windows Workflow Foundation, and the Enterprise Library–January 2006

Scenarios

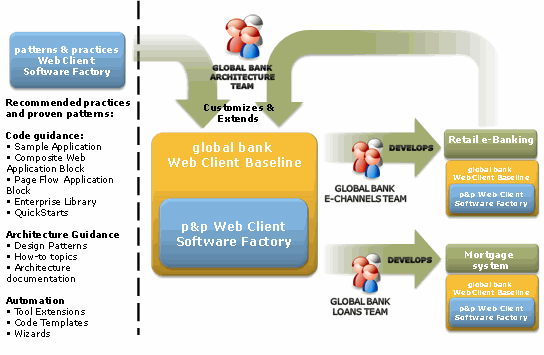
Architects can use the Web Client Software Factory to create their own client baseline architecture. They can distribute that baseline for developers to use as a starting point to build specific instances of Web applications. The below Figure illustrates the process for using the Web Client Software Factory on the fictitious Global Bank project.

WCF Scenario

Architect Scenarios

As the architect, you want to make sure that Web applications developed in your organization derive from a sound, high quality, proven practice–based foundation that meets the following guidelines:

It provides a standard approach to application development.
It promotes re-usability of common architectural patterns and components.
It hides complexity.
It allows developers to focus on business problems instead of infrastructure components.
The Web Client Software Factory is the starting point for creating that foundation. It provides out-of-the-box implementation of a set of features that are common to Web client composite applications and page flow applications.

You take this out-of-the-box baseline and customize and extend it to better fit your specific needs. As an architect, you might customize, extend, and deploy the following:

Templates, recipes, and designers to include your own appearance and behavior, your own naming conventions, and custom actions Documentation, patterns, and How-to topics
Application blocks, by using the provided extensibility points and adding new libraries

Developer Scenarios

As an application developer, you may want to focus on the business logic and the user experience of your Web client application. A baseline architecture, such as the Web Client Software Factory, provides many of the common infrastructure services needed to build your business applications. This baseline may be modified and extended by the architecture team in your organization or on your project.

You can review the patterns, the How-to topics, and the reference implementation (Global Bank Commercial e-Banking) to understand the proven practices for developing Web applications using the provided guidance. You can use the Web Client Development guidance package to generate the initial solution, add modules, add views and presenters, and so on.

Benefits

The Web Client Software Factory provides the following benefits for the business team, the architecture team, the developer team, and the operations team.

Value for Business

Applications built using the Web Client Software Factory result in increased user productivity and simplification of business tasks. This is achieved through the following features:

  • It provides common and consistent user interfaces; this reduces end-user training needs.
  • It provides easy rollout of new and updated functionality and tasks by the business owners faster and with improved quality.

Value for Architecture Teams

Applications built using the Web Client Software Factory result in improved quality and consistency. This is achieved through the following:

  • It has the ability to create a partial implementation of a solution that includes the most critical subsystems and shared elements. This partial implementation, known as the baseline architecture, addresses non-trivial design and development challenges, exposes the architectural decisions, and mitigates risks early in the development cycle and hides complexity from developers.
  • It has the ability to create and distribute to developers the common development architecture for Web applications that include logging, exception handling, authentication, authorization, and a common appearance and behavior.
  • It applies a modular approach that allows teams and/or departments to independently develop and deploy modules that look like they were developed by one individual.

Value for Developer Teams

Applications built using the Web Client Software Factory result in increased productivity and faster ramp-up times for developer teams. This is achieved through the following:

  • It provides an effective way to create a high-quality starting point (baseline) for Web applications. The baseline includes code and patterns typically discovered in Iteration 0, or the elaboration phases, of a project. This means that projects begin with a greater level of maturity than traditionally developed applications.
  • It provides automation of common tasks in Visual Studio, such as creating a Web solution, creating business and foundational modules, creating views with presenters, and creating page flows. With this automation, developers can easily apply guidance in consistent and repeatable ways. The automation with the architecture does the following:
    • It integrates your Web pages with master pages and themes for consistent user interfaces across teams.
    • It creates proven solution and project structure that you would otherwise have to manually complete.
    • It creates a profile-based user interface by using an ASP.NET site map, an ASP.NET role manager, and the Enterprise Library Security Application Block, so you do not have to write custom code.
    • It creates test projects for you.
    • It provides a designer to create and modify your page flow.
  • It provides an abstraction and separation of concerns; this means that developers can focus solely on business logic, the UI, or the application services without requiring in-depth knowledge of the infrastructure and baseline services.

Value for Operations Teams

Applications built using Web Client Software Factory result in a consolidation of operational efforts. This is achieved through the following:

  • It supports use of XCopy deployment; this enables a common mechanism for updates and versioning across modules; this minimizes downtime.
  • It uses distributed, module-specific configuration files; this minimizes configuration contention.
  • It consolidates common components; this results in fewer, simpler files and it reduces the number of potential common language runtime (CLR) versioning issues.
  • It provides a pluggable architecture that allows operations teams to control the basic services (such as authentication and exception logging) from server-side infrastructures.
  • It provides a common exception management system that makes troubleshooting easier.

Software Factory Contents

The Web Client Software Factory is an integrated collection of tailored software assets that support composite Web application development. The collection includes the following:

Application blocks and libraries. The Composite Web Application Block, Page Flow Application Block, ObjectContainerDataSourceControl control are included in the software factory. The software factory also uses Enterprise Library application blocks for security, exception management, logging, and data access.

Recipes. The software factory includes the Add View (with presenter) recipe and Add Page Flow recipe. Recipes automate procedures in How-to topics, either entirely or selected steps. They help developers complete routine tasks with minimal input.

Templates. The software factory includes the Solution template, Business Module template, Foundational Module template, and Page Flow template. Templates are prefabricated application elements with placeholders for concrete arguments. They can be used for many purposes, including creating initial solution structures to creating individual solution artifacts, such as project items.

Designers. The software factory includes the page flow designer. Designers provide information that architects and developers can use to model applications at a higher level of abstraction. Designers can also generate code that is compatible with the architecture baseline.

Reference implementation. The software factory includes the Global Bank Corporate e-Banking reference implementation. A reference implementation provides an example of a realistic, finished product that the software factory helps developers build.

Architecture guidance and patterns. The software factory includes architecture guidance and patterns that help explain application design choices and the motivation for those choices.

How-to topics. The software factory includes How-to topics; these are documented step-by-step instructions that describe how to implement recommended practices in a specific domain.

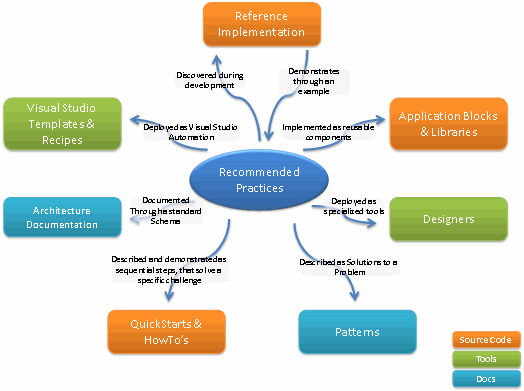
Figure 2 illustrates the assets of the Web Client Software Factory.

WCF Assets
Figure 2. Web Client Software Factory assets

The software factory also uses the following existing patterns & practices assets:

Enterprise Library
Guidance Automation Extensions
Guidance Automation Toolkit
Software Factory Capabilities
You can use the Web Client Software Factory to address common requirements for different areas of your Web client application architecture. Figure 3 illustrates the primary application areas targeted by this release of the software factory.

Note You can also extend and customize the software factory to meet your specific requirements. For more information, see Customizing the Web Client Software Factory.

WCF Core Challenges